- This tutorials details how to install Node-Red on the Raspberry Pi for Andino Boards.
- For documentation on all custom Andino nodes, refer to Installing custom nodes at the bottom of the page.
The easiest way to install Node-Red is by running our Andinopy install script. The script will automatically install all dependencies, as well AndinoTCP, which is necessary to use the Andino OLED node and recommended to use the Andino X1 node.
Node Red can also be installed manually. However, note that many of the custom Andino Node-Red nodes require Andinopy to work correctly. To use these nodes, please install Andinopy as described here.
To save write cycles on your SD Card you can install Log2Ram which stores the Log Files in memory. This isn't strictly necessary but highly recommended as it dramatically increases the lifespan of the Pi SD card.
First, install git:
sudo apt -y install gitGet log2ram from the git repository:
git clone https://github.com/azlux/log2ram.gitEnter the new directory and make the install script executable, then run the script:
cd log2ram
chmod +x install.sh
sudo ./install.sh
Finally, reboot the Pi:
sudo reboot Check if log2ram is running. The command
df -hshould reveal it as an entry:
log2ram 40M 452K 40M 2% /var/logAfter that you can install Node.js and Node-Red.
bash <(curl -sL https://raw.githubusercontent.com/node-red/linux-installers/master/deb/update-nodejs-and-nodered)To run Node Red from the terminal
node-red-piTo run Nore-Red in background on boot:
sudo systemctl enable nodered.serviceNode-Red is now fully set up and can be reached on port 1880 by default.
Note: If you got an Andino device with Node-Red pre-installed, the default login credentials for the Web UI are admin/admin.
If you want to enable username/password authentication for accessing the UI, first edit the Node-Red settings file:
nano ~/.node-red/settings.jsHere, uncomment the whole adminAuth section (press Ctrl + W, then type adminAuth and hit Enter)
// Securing Node-RED
// -----------------
// To password protect the Node-RED editor and admin API, the following
// property can be used. See http://nodered.org/docs/security.html for details.
adminAuth: {
    type: "credentials",
    users: [{
        username: "admin",
        password: "$2b$08$nz5H8H5uUtYObtSKM2wpEOYTvRN9PpEOVX6mPJZgrNETh8seCBXzC",
        permissions: "*"
    }]
},
For every user, you now need to generate a password. This can be done by saving, then exiting the file (Ctrl + O; Ctrl + X), then running
node-red admin hash-pwEnter your password, then press enter. This will return the password hash. Copy it, edit the settings.js file again and paste it in the now uncommented password section in place of the pre-existing token. Save and quit the file, then restart Node-Red:
sudo systemctl restart nodered.serviceThe WebUI should now be secured with a password. If you also want to enable HTTPS, or wish to add more users and enable custom permissions per user, please refer to the official Node-Red documentation
While this configuration already offers some functionality, there are several purpose-built nodes for usage on Andino boards. A full list of all available nodes can be viewed by going to the Node-Red Settings, selecting Palette and Install. Here, search for andino to see a list of all Nodes.
All nodes can be installed in two ways:
-
Search for the package name of the node/node collection in the Palette manager (see section above)
-
Install the node with npm: Run the following command in the Node-Red directory - per default: ~/.node-red
sudo npm install packageName
The following Nodes are available for Andino boards:
Package name: node-red-contrib-andinox1
The Andino X1 node enables communication between NodeRed and the Andino X1 firmware via Andinopy TCP. Specifically, it allows the user to:
- Read the current state of the digital inputs of the Andino board and see the number of impulses on a specific input
- Control the relays of the board and see their current state
- Read temperature data from DS18B20 sensors
For detailed documentation on the node, refer to Andino X1 Node.
Package name: node-red-contrib-andino-sms
This collection includes four nodes that facilitate sending and receiving SMS messages on an Andino board using a 2G or 4G modem.
For setup instructions refer to Andino SMS Nodes
Package name: node-red-contrib-andinooled
This node enables controlling the OLED display of Andino IO devices easily through NodeRed. It does so by connecting to Andinopy TCP.
For setup instructions refer to OLED display control node (Adafruit SSD1306).
Some more information and samples about Node Red
[https://randomnerdtutorials.com/getting-started-with-node-red-on-raspberry-pi/]()
If you have chosen Home Assistant as OS, Node Red can be installed as an addon and thus the I/Os of the Andino device can still be used.
Prepare the SD card with Home Assistant according to the instructions. You can find the instructions under the following link:
After flashing the OS, it must still be adjusted. It is necessary to adjust the configuration of the serial interface. Follow the steps below.
In the boot directory the file config.txt must be edited. In the lower area there are the two lines:
"#enable_uart=1"
"#dtoverlay=miniuart-bt"
remove the "#" character. Additionally the following line must be inserted "core_freq=250". Leave all other settings as they are.
Your file should look like this:

Furthermore the following sequence must be deleted in the file cmdline.txt:
"console=tty1"

now continue with the installation of the Home Assistant.
Once the basic installation is complete and the system is set up, Node Red can be installed as an add-on.
To do this, click on Settings -> Add-on -> Add-on Store -> Node-RED.
Now click on Install. Now wait until Node-Red is completely installed.

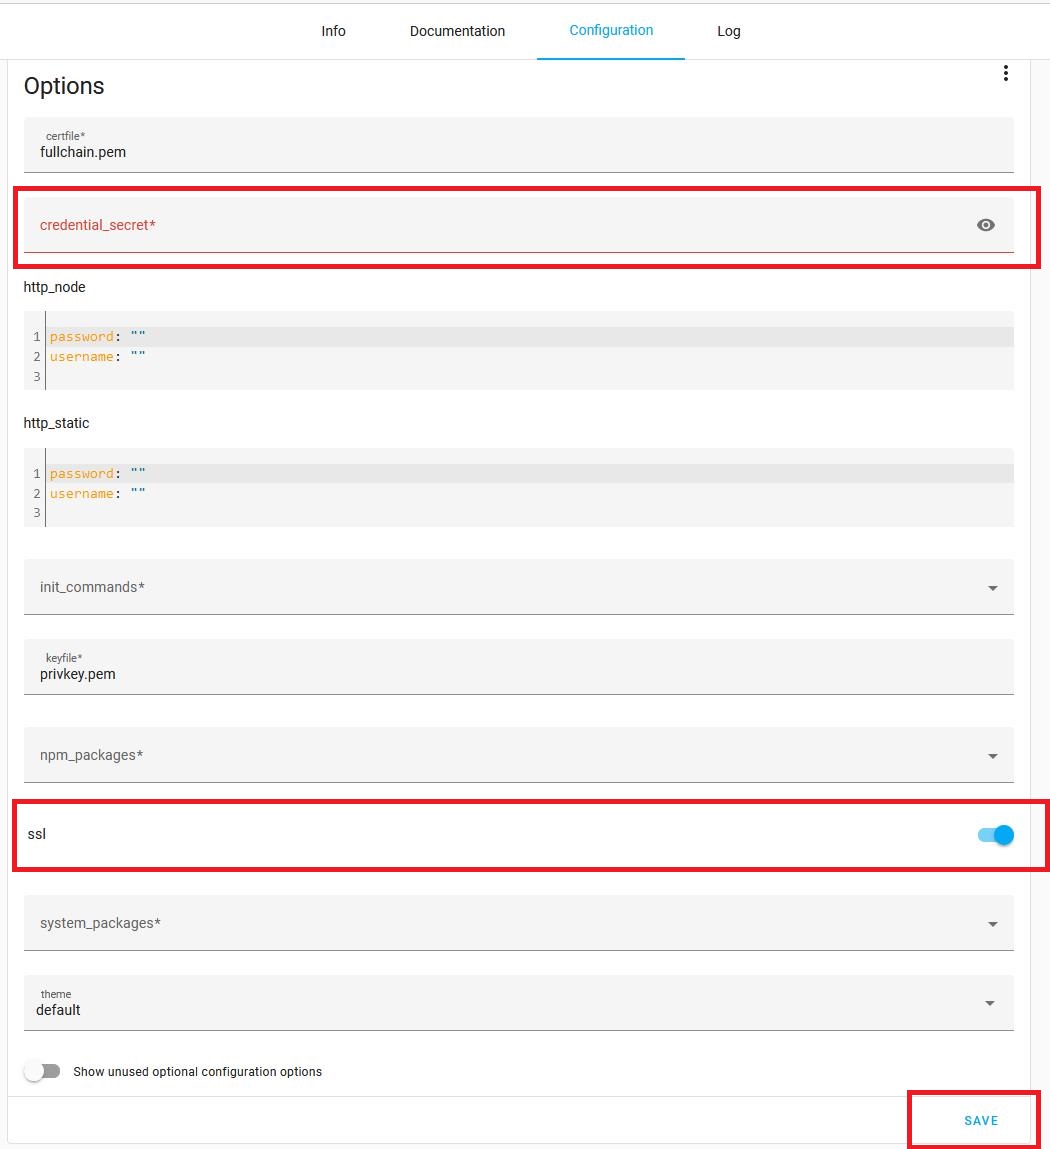
Click on Configuration, there are a few settings to be made for this.

Node-Red expects a password under credential_secret. If you do not have a suitable SSL certificate available, deactivate this option.
Confirm the entries with Save.
Now Node-Red can be started.
Afterwards Node-Red can be opened.
Switch to the settings in Node-Red.

Palette -> Installation -> Search "andino".

Install all 3 andino packages.
Now Node-Red has been configured successfully and you can use the Andino devices.
- 2021 by AndinoSystems
- Contact us by email