Package name: node-red-contrib-andinooled
A Node Red node that enables processing of text for the Andino OLED display (Adafruit SSD1306). This page explains the process of using the Node-Red with the OLED display of the Andino IO/XIO.
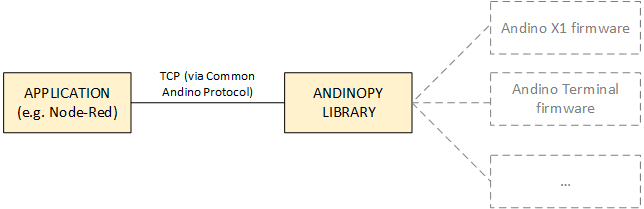
This node allows for easy control of the OLED display of Andino IO boards via Node-Red. The node needs the Andinopy TCP socket to be installed and running, since it uses the Common Andino Protocol to communicate with the Atmel controller. For instructions on how to install Andinopy, please refer to Andinopy: Setup and Usage. Here, follow the Setup and Usage and TCP Socket sections.
Your Raspberry Pi also has to have Node-Red set up. To do so, please follow the guide Installing Node-Red on the Raspberry Pi.
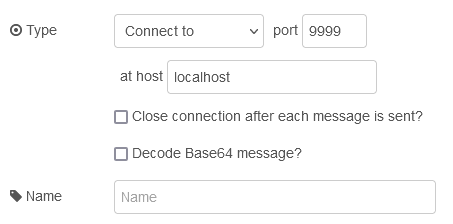
The communication between the Node-Red component and Andinopy takes place via TCP. To establish a connection, start the TCP server as described in the installation tutorial, then drag a tcp out node to the main screen of Node-Red and connect it to the output side of the AndinoOLED node. Double click the TCP node and set the properties to: Connect to, port 9999 and enter the hostname localhost. Click Done to finish the node configuration.
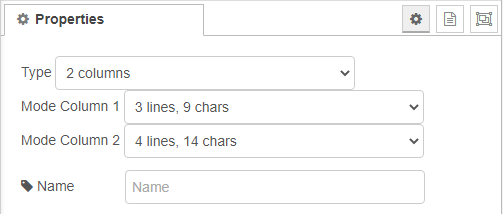
Double click the AndinoOLED node to start the configuration. Here, the output mode can be selected. First choose how many columns (one or two) the output text should have.
Afterwards, select the mode for both columns. The modes can be differentiated by the amount of lines and number of characters that fit on the screen. Chars always refers to the number of characters that fit on the screen when 1 column is selected as the type, if 2 columns is selected, only half of the listed number of characters will fit into the column.
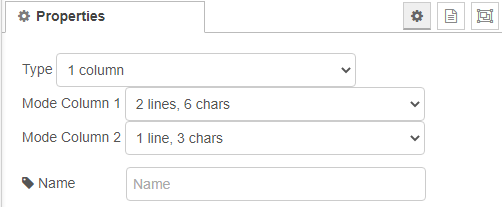
Note: When selecting 1 column as the type, all configuration and inputs for column 2 will be ignored.
Depending on the configuration, these are some possible output formats:
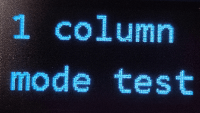
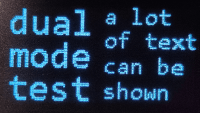
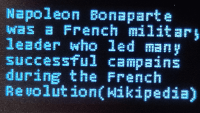
The AndinoOLED node is triggered every time it receives an input. It expects two arrays with 6 Strings for both columns, these must be named msg.lines1 for column 1 and msg.lines2 respectively. Every object in the array will be printed as a new line on the display, if a mode with less than 6 lines is chosen in the node properties, the extra Strings will be disregarded.
As a simple way to test the node, the arrays can be created using a function node. Double click the function node and enter the following code under the function tab:
var lines1 = ["test1", "test2", "test3", "test4", "test5", "test6"]
var lines2 = ["test7", "test8", "test9", "test10", "test11", "test12"]
msg.lines1 = lines1;
msg.lines2 = lines2;
return msg;
Click Done and connect the function node to the AndinoOLED node and an inject node:

When clicking the button on the inject node, the array messages should now appear on the display.
You can download and add the examples to your Node-Red install by simply uploading this .json file in your Node-Red interface (or copying its contents). To do so, press Ctrl + i in your Node-Red web UI, then either paste the file content or upload the file.