Andino X1 Pico is a base board that allows the raspberry pi to be used in an industrial environment on a DIN Rail. This configuration also includes a LoraWAN modem and the UART RS232-WAN Extension.
The setup documentation section can be found at the bottom!
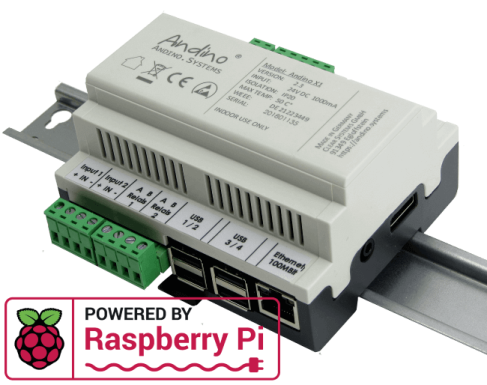
The Andino X1 Pico is a microcontroller board for the Raspberry Pi in a DIN-rail housing for installation in a control cabinet. It is used to adapt digital inputs and outputs for a voltage of 24 V. The X1 Pico has its own microcontroller for precise signal preprocessing and adaptation of signal generators and actuators. It also contains a Raspberry Pi (2/3). The inputs and outputs as well as the power supply of the Pi are optimally protected. Communication between the microcontroller and the Pi takes place via the UART interface.
For full documentation on the Andino X1 Pico board, see Andino X1 Pico
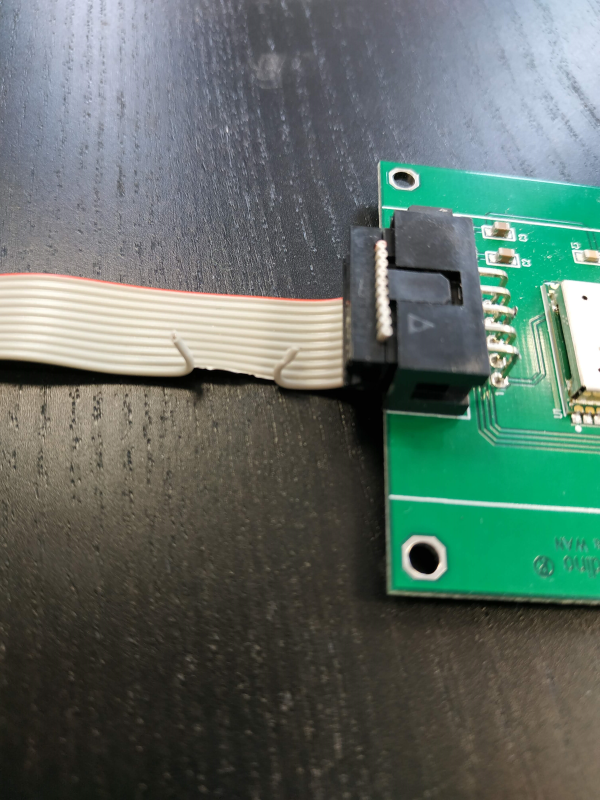
The LoraWAN modem is connected to the UART RS232-WAN extension as descibed in Dual Channel UART RS232-WAN Extension.
With this LoRaWAN Modem you are able to connect the Raspberry Pi to the LoRa WAN Network.

The Lora Modem is connected via the internal RS232 Connector to the /dev/ttySC1 for the Andino X1 and /dev/ttyAMA0 for the Andino IO
For downloads of all scripts used in this tutorial, see our GitHub repository.
First, run
sudo nano /boot/cmdline.txtTo ensure correct shell behavior, remove entries beginning with console= in this file. An example for entries needing to be removed is highlighted here with >>[entry]<<. After having edited the file, save and exit.
dwc_otg.lpm_enable=0 >>console=serial0,115200 console=tty1<< root=/dev/mmcblk0Afterwards, run
sudo nano /boot/config.txtJump to the end of the file and add
enable_uart=1
dtoverlay=pi3-disable-bt-overlay
dtoverlay=pi3-miniuart-bt
Finish by rebooting the pi
sudo rebootFirst, install some tools for testing
sudo apt-get install screen elinks minicomTesting the modem connection can be done via minicom. For the initial setup, run
sudo minicom --setupAfter having completed the initial setup, minicom can be run without the --setup flag in the future. Enter Serial port setup
+-----[configuration]------+
| Filenames and paths      |
| File transfer protocols  |
| Serial port setup        |
| Modem and dialing        |
| Screen and keyboard      |
| Save setup as dfl        |
| Save setup as..          |
| Exit                     |
| Exit from Minicom        |
+--------------------------+
Here the connection can be set up.
To connect to the modem, the serial device has to be set to /dev/ttySC1 for Andino X1 and /dev/ttyAMA0 for Andino IO
+-----------------------------------------+
| A -Serial Device  : /dev/ttySC1         |
| B - Lockfile Location : /var/lock       |
| C -   Callin Program  :                 |
| D -  Callout Program  :                 |
| E -Bps/Par/Bits   : 57600 8N1           |
| F - Hardware Flow Control : No          |
| G - Software Flow Control : No          |
|                                         |
|Change which setting?                    |
+-----------------------------------------+
After completing the configuration, press the Esc key to return to the main setup menu, choose Save setup as dfl to save the configuration for future usage and exit.
Now you can communicate with the Modem. After a command you need to type
sys reset <CTRL>M <CTRL>J
RN2483 1.0.4 Oct 12 2017 14:59:25The Reset of the Modem can be controlled via the RTS Line. By default this line is cut the that the Modem runs on Power On. If you like to controll the Reset via RTS you need to replace the cable.

pi@raspberrypi:~ $ python get-deveui.py
sys reset
RN2483 1.0.4 Oct 12 2017 14:59:25
mac get deveui
0004A30B002544A2- 2020 by AndinoSystems
- Contact us by email