The Andino X1 can be used to read temperatures from DS18B20 1-Wire temperature sensors. These sensors are connected to the Andino board via one or two busses.The temperature is then returned through the serial interface and can easily be further processed by the Raspberry Pi. This article provides an explaination on the hardware and software installation. For information on the firmware itself, please refer to the Andino X1 Firmware page.
Before connecting the sensors to the Andino board pins, the pins fist have to be connected internally. This can easily be done using a breadboard:
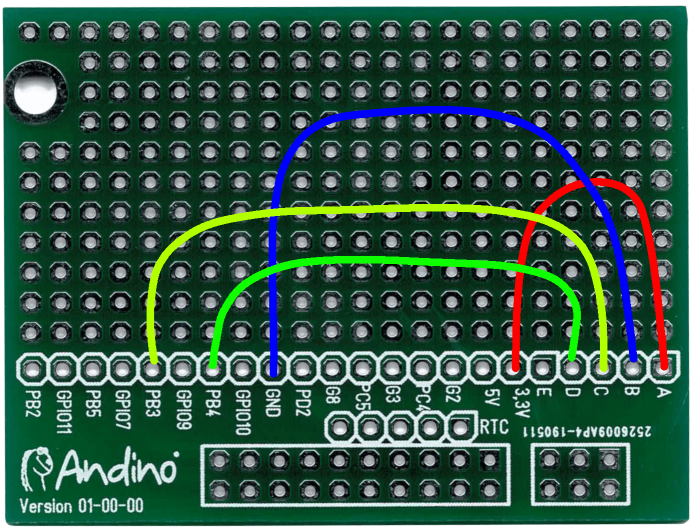
Connect the A pin to +3.3V, the B pin to GND. Now, connect the bus pins. Per default, these are C, connected to PB3 and D to PB4. The latter can be skipped if you only want to use one bus.
Afterwards, the sensors can be wired to the inputs of the Andino board. All sensors have to be connected to A (3.3V, red wire) and B (GND, black wire). Depending on the bus, that the device will be on, connect the remaining wire to either C (for bus 1) or D (for bus 2). Furthermore, a 1k4 pull up resistor has to be connected to A and both channel pins (C/D).
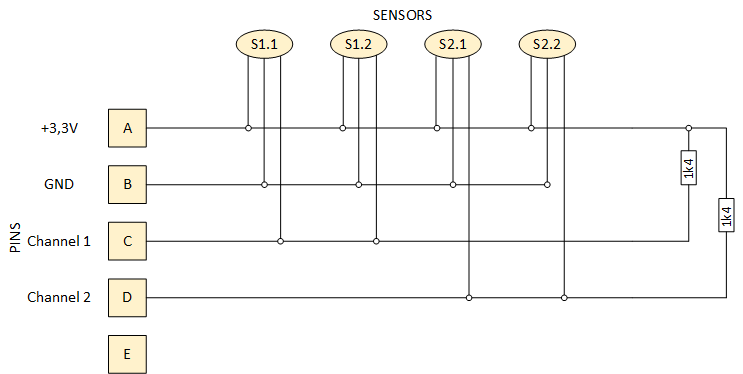
The hardware installation is now complete.
Temperature sensors are only supported on Andino firmware Version006 (210107) and up. The version can be checked by running the INFO command on the Andino serial interface.
For information on how to install/update the firmware, please refer to the Setup Documentation for the Arduino IDE and the firmware installation section.
Inside the serial monitor of the Andino, first set the Hardware configuration of the Andino X1 to enable the usage of temperature sensors. This can be done by running HARD 4. After having set the number of active busses with TBUS 1 / TBUS 2, you can now check if all sensors show up correctly by running ADDRT 1 for bus 1 and ADDRT 2 for bus 2. If everything looks good, the temperature update messages can now be activated with SENDT n (where n is the number of milliseconds between two update messages (between 100 ms and 60000 ms).
For full detailed documentation on firmware usage, including more information on usage with temperature sensors can be found on the Andino X1 Firmware page.
The temperature sensors can easily be integrated into flows in Node-Red via our custom Andino X1 node. To do so, simply follow our Installation guide for custom nodes as well as the Andino X1 node documentation.
- 2021 by AndinoSystems
- Contact us via email