You are welcome to use and adapt the library sources as a basis for your project.
Here is the GIT Repository
We recommend communicating directly with the firmware via the UART protocol for the Andino X1. For the "Andino IO" and "Andino Gateway", we recommend accessing the GPIO directly. Libraries for this are available for most programming languages.
This page documents the Common Andino Protocol that is used by most Andino software, including the Andinopy Library, most Andino Node-Red Nodes and more.
The protocol is ascii based.
- It consists of commands (host to device) and messages (device to host).
- Commands and messages are line oriented.
- A line of a command can be terminated with CR, LF or CR+LF.
- A message always starts with ":" and ends with CR+LF.
Commands are always reflected. E.g. the command "SEND 1000" is sent back to all connected hosts as confirmation.
If there are errors in the command SYNTAX text is returned. Text indicates the type of error
| Command | Arguments | Action | Example |
|---|---|---|---|
| RESET | none | Reset the software | RESET |
| INFO | none | Prints the current settings | INFO |
| Command | Arguments | Action | Example |
|---|---|---|---|
| POLL | Cycle in ms | Sets the sampling cycle of the digital inputs [in ms] | POLL 1000 |
| SKIP | Number of polls | Skip n Scans after pulse recognized | 0 |
| EDGE | HL(0) LH(1) | Count on edge HL or LH | EDGE |
| SEND | Cycle in ms (0 for off) | The counter will send all nnn milliseconds | SEND 5000 |
| CHNG | Send on Change | Send if any Pin changes. Careful if many changes | CHNG 1 |
| CNTR | Send Counter | Send counter+states(1) or only states(0) (default 1) | CNTR 0 |
| DEBO | Number of polls | Sets the debounce count. The signal has to be stable for nn polls | DEBO 100 |
| Command | Arguments | Action | Example |
|---|---|---|---|
| POWR | state (0 or 1) | Power-Out Relay is switched on or off | REL1 1 |
| REL? | on-off (0 or 1) | Append current state of relays to status messages | REL? 1 |
| REL1 | state (0 or 1) | Relay 1 is switched on or off | REL1 1 |
| REL2 | state (0 or 1) | Relay 2 is switched on or off | REL2 1 |
| REL3 | state (0 or 1) | Relay 3 is switched on or off | REL3 1 |
| REL4 | state (0 or 1) | Relay 4 is switched on or off | REL4 1 |
| RPU1 | pulse in sec | Pulse the Relay 1 for nns seconds | RPU1 2 |
| RPU2 | pulse in sec | Pulse the Relay 2 for nns seconds | RPU2 2 |
| RPU3 | pulse in sec | Pulse the Relay 3 for nns seconds | RPU3 2 |
| RPU4 | pulse in sec | Pulse the Relay 4 for nns seconds | RPU4 2 |
| Command | Arguments | Action | Example |
|---|---|---|---|
| SENDT | Cycle in ms (0 for off) | The counter will poll and send the busses every nnnn milliseconds | SENDT 8000 |
| TBUS | 1=one bus, 2=two busses | Sets the number of temperature sensor busses to 1 or 2 | TBUS 2 |
| ADDRT | 1=bus1, 2=bus2 | displays the addresses of all sensors connected to the specified bus | ADDRT 1 |
| POLLT | none | Polls temperatures once | POLLT |
| Command | Arguments | Action | Example |
|---|---|---|---|
| OLED MODE | XX [YY] | Sets the mode(s) of the OLED display (see description below) | OLED MODE 21 30 |
| OLED | <{line1}{line2}...}><{line1}{line2}...> | Prints text on the OLED display | OLED <{dual}{mode}{test}><{a lot}{of text}{can be}{shown}> |
When entering two arguments for the modes, the display will be devided into two columns, with each using the designated mode. Changing the first digit of the mode modifies the number of lines. Changing the second digit modifies the text size. The following modes are available:
"10":  1 line, 3 chars
"11":  1 line, 4 chars
"20":  2 lines, 6 chars
"21":  2 lines, 9 chars
"30":  3 lines, 9 chars
"31":  3 lines, 12 chars
"40":  4 lines
"60":  6 lines
Note that, when using two columns, only half the amount of characters will be available within each column.
The text can be printed with the OLED command. Here, every column needs to be contained in angle brackets, every individual line in curly braces. To avoid compatibility issues, it is recommended to always add enough braces for both colomns with six lines each, even if not all colomns/lines are in use (see examples below).
Examples:
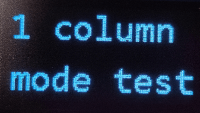
OLED MODE 21 / OLED <{1 column}{mode test}{}{}{}{}><{}{}{}{}{}{}>
OLED MODE 30 40 / OLED <{dual}{mode}{test}{}{}{}><{a lot}{of text}{can be}{shown}{}{}>

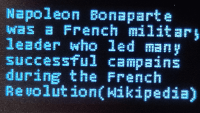
OLED MODE 60 / OLED <{Napoleon Bonaparte}{was a French military}{leader who led many}{successful campains}{during the French}{Revolution(Wikipedia)}><{}{}{}{}{}{}>
| Command | Arguments | Action | Example |
|---|---|---|---|
| BUZZ | Duration in ms | Beeps the beeper for a specified amount of time | BUZZ 1000 |
| Command | Arguments | Action | Example |
|---|---|---|---|
| DISP command | see Nextion Documentation | command is forwarded to Nextion display | DISP box.txt="Hello" |
| INPUT "title" input-length | Title of the Input and the length of input field | Creates an numeric input field, Result will be send with @I[] | INPUT "Enter ID:" 3 |
Note:
only one input field is allowed at a time. An empty text will cancel the input field. The Char is the placeholder for the input. E.g. Enter ID: _ If the user press ENTER the content of the entered data is sent with the @I command to the host.
All messages from the controller are structured in the following way:
:counter[type_identifier]message<CR><LF>- Every message from the controller can be identified by the colon (:) at the beginning.
- The counter is a four digit HEX counter that iterates with every message sent from the controller (modulo HEX counter from 0000 to FFFF).
- After this, the type of the message is specified.
- The Messages end with a CR / LF [0x0d + 0x0a]
:xxxx{counter} {input-status} {relay-status}After the colon and the counter follow three blocks which are in "{" and "}".
- Counter stands of the digital inputs.
- Current status of the inputs
- Current status of the relays
The Relay Block can be switched off and on with the command REL? 1 or REL? 1 The Counter Block can be switched off and on with the command CNTR 1 or CNTR 0
After the : and the counter the current states are displayed inside '{' and '}' (0=off, 1=on). If the setting REL? 1 has been activated, a third set of curly braces follows, containing the current state of the relays. The number of available inputs and relays depends on the hardware configuration.
Messages are either sent periodically following the send cycle specified using the command SEND or only if a change is detected when CHNG is active. (see the command section above)
Example:
:0040{0002,0000,000B}{0,0,0}
:0041{0002,0000,000B}{0,0,0}
or if REL? 1:
:004A{0008,0000,000F}{0,0,1}{0,1}
:004B{000A,0000,0000}{0,0,1}{0,1} If the counter field is followed by an "@" character, it is an event-driven message.
The "@" is followed by the identifier of the type of message.
- T temperature readings
- R RFID detected
- S Barcode scan line
- K Key-Press Event
- U Key-Up Event
- I Input field result
- D Events from the Touch screen
- E Error. An error has occurred
Temperature sensor messages are always specified with the type @T following the colon and the counter. This is then followed by the bus number in {}. After that, the temperatures are displayed in the next section. They are always specified in °C, with two decimal places and delimited by a comma.
Example:
:008D@T{1}{22.00,21.25}
:008E@T{2}{35.31,31.56}
:008F@T{1}{22.03,21.28}This message will be sent if a key on the keypad is pressed. The key-code is the first parameter surrounded by a { }. The second argument is the duration the key is pressed in seconds.
Example:
:00E9@K{3,0}
:00F0@K{U,0}
:00F0@K{U,1}
:00F0@K{U,2}
Keymapping
| Code | Meaning |
|---|---|
| 0..9 | 0..9 |
| a,b,c,d,e,f | F1 to F6 |
| X | ESC |
| U | Up |
| D | Down |
| O | OK |
| < | Back |
The Message is similar to the Key Press Event. It will be fired if the key is released.
:00F0@U{A,2}The ID of the RFID Tag is surrounded by { }
Example:
:00F0@R{9917acbe31463}The Scan line is surrounded by { }
Example:
:00F0@S{i am a scan line}When an input field is active, the user has entered a content and pressed OK, the content of the inserted data is sent surrounded by { }.
:00F0@I{345}The display sends the ID and optionally a value.
In this example the Display send a value of 200 for the object 16.
:00F0@D{16,200}The Display need to send one or two 4 byte values This code has to inserted into the event function in the display.
prints "<",0
prints connect.id,0
printh h0.val,0
printh ff ff ff
Value can also mean press and release.
Press-Event
prints "<",0
prints connect.id,0
printh 00 00 00 00
printh ff ff ff
Release-Event
prints "<",0
prints b0.id,0
printh 01 00 00 00
printh ff ff ffwhen an internal error is detected, this message is sent.
In this example the Display send a value of 200 for the object 16. The Message has three parts.
- Subsystem
- Error within this subsystem
-
optionally a value
:00F0@E{6,12,900}
The subsystems, error numbers depend on the hardware used and can be found there.
- 2023 by Andino Systems
- Contact us via Email